


How to install an electrical outlet
The harnessing of the electron to power the myriad conveniences and wonders of modern life is one of humankind’s greatest achievements, and underpins like nothing else the explosive technological progress of the last century and a half. Sadly, most people have only the vaguest idea what electricity actually is, and are often overcome with self-doubt at the thought of undertaking even simple electrical improvements. In this article, we will confront those fears head-on as we walk through a typical project. The first step is to become more familiar with electricity. According to the de Broglie hypothesis – one of the cornerstones of quantum physics – electrons and indeed all objects have both a wave and particle nature, though it’s not really noticeable in anything bigger than an atom. However, there are two interesting points to keep in mind about that as we install our outlet (the actual process of installing an outlet is painfully dull, and the twists and turns of the de Broglie hypothesis, which has a lot to do with electrons, which in turn have everything to do with electricity, will give us something to think about while we’re drilling holes and such): First, in the category of all objects, we can ipso facto include ourselves; second, it’s entirely possible that we haven’t noticed the wave/particle nature in anything large (such as ourselves) because we’re just not looking in the right place. After all, each of us contains quite a few electrons jiggling around amidst all the other stuff, and they must have some effect – mentally if not physically. Perhaps all those jittery electrons have something to do with those persistent, unsettled feelings about life that so many of us are plagued with? Food for thought. But back to the task at hand, tedious though it may be. Pick a location for your new outlet, then remove the cover plate from the closest existing outlet, which is where the power for the new outlet will come from. Remove the screws that attach this outlet to the plastic or metal electrical box and then pull the outlet outwards by the rabbit ears at the top and bottom. Now, before you have time to think much about consequences, spread your thumb and forefinger and grasp the outlet right at the two opposing screws that the bare wires are wrapped around. Direct, immediate action is necessary here. No hesitation. (One tiny caution – make sure you’re not standing barefoot in a puddle of water when you do this.) In slightly less than an instant, if you’ve followed the instructions correctly, you will feel an intense jolt travel up your arm and through your entire body. Many first-timers find themselves flung violently backwards, without conscious volition. This is a completely normal response; only serious adepts are able to hold on for more than a fraction of a second. Your initial thought as you lie twitching on the floor may be something like “Owwwhh!!!” Some liken the sensation to being tickled, except multiplied a thousand-fold and without any feeling of hilarity. But take a deep breath, focus and push deeper. Look through the pain: notice how in that moment all your ordinary consciousness, all your inner uncertainty and pointless worrying about life simply dissolved into nothingness – was swept entirely away. There are equations describing this, but in non-mathematical terms, what essentially happened is that an elemental force that began it’s journey in the first instant of the big bang and will end it when time dies took a sudden detour through your tender flesh. Quickly, as the last tingles slowly fade away, ask yourself: "Was I wave or particle just then?" If you think you know the answer, contact the nearest physicist and tell them "de Broglie sent me." They'll know what to do. De Broglie himself is long gone, but quantum physicists have a legend that every time someone understands what he was talking about, two wandering protons suddenly collide in a particle accelerator somewhere, and from their splattered remains a beautiful new data set is born. Once you are able to stand again, turn off the circuit breaker and remove the outlet from the box. Don’t be gun-shy about this. Best to jump back on the horse that threw you, as the old expression goes. We all tend to compartmentalize the world around us, separating it into “I” and everything else – as if we were just tourists strolling through it, admiring quaint scenery from a safe distance. The direct experience of electricity breaks through this barrier. Perhaps this compartmentalization was an important evolutionary adaptation back in the days when much of the scenery wanted to eat us. But is it still necessary? Most philosophers argue that really this separation is false – that the sense of “I” is simply an illusion created by a relative handful of neurons in our brain. Modern science too is quite clear that on a basic atomic level there really isn’t much difference between a human and, say, dirt. Just two different structures built from the same tiny lego blocks. Therefore, as you putter away at your outlet, you might find it fruitful to ask yourself, “What was ‘I’ just now? Where did ‘I’ go?” Incidentally, you may have discovered by now (and I probably should have told you) that, through carelessness, poor handwriting, or occasionally actual malice, circuit breakers are often not accurately labeled and that the outlet which you thought was safely unpowered is still very much so. This happens, even to the most experienced, but it gives me an opportunity to introduce a little fun into the job. Lawyers and old maids would have you believe that the only certain way to locate the circuit breaker for a given outlet is to check the wires with a non-contact voltage tester as you flip the breakers. That will certainly work, but here’s a more exciting way. Cut a foot or so of wire from a roll and strip an inch of the insulation from both ends. Bend the wire into a U shape and hold one end against the silver-colored neutral screw on one side of the outlet. Now carefully touch the other end to the gold-colored hot screw on the other side of the outlet. As soon as the wire makes contact there will be flash of light and a small but exciting explosion. Too quickly for human eyes to see, the tip of the wire will fuse with the screw. Assuming you’re holding the wire by the insulated part, there’s little danger to you, so relax and enjoy the fireworks. But entertainment value aside, creating a short circuit will immediately flip off the mystery circuit breaker, allowing you to locate and label it confidently without wasting time on trial and error. With the outlet finally powered down, disconnect all the wires and remove the metal or plastic box housing it. If the box is nailed to the stud, cut the nails with a hacksaw blade or reciprocating saw. Pull the box out, then cut a new hole further down the wall for the new outlet. The next step is to fish a length of wire from the old outlet to the new outlet location. This can be tricky, and since every house is different, you’ll have to figure it out on your own. I’ll share a story about running wire, though, that might give you some ideas. A friend of mine was trying to run wire for a three-way switch through 15 feet of 2 x 4 stud wall, and not having much luck. There was a thick concrete slab below him, so dropping the wire down to a basement and across was not an option. The roof above was constructed of 4-inch thick, tongue-and-groove, Western Red Cedar (D grade and better), which imparted a pleasant cedary smell to the house but left no room at all for wires. The wall on one side was covered with priceless antique wallpaper and obviously could not be chopped into, while the other side was paneled in extremely rare, crotch-grained, flame-pattern Costa Rican mahogany panels so securely fastened to the wall that my friend, even after an hour of study, could see no way of prying them loose without destroying them. After pondering the problem for the better part of a morning, my friend finally became so frustrated that he impulsively jammed his .44 Magnum into the hole in the wall where the old switch had been, aimed it at the center of the next stud, and fired. The recoil shattered his wrist and he lost consciousness for a bit, but when he came to, lo and behold, there was a clear path for the new wire all the way through the wall. There was some collateral damage, of course, as is to be expected when you use such a powerful weapon indoors, and I can’t by any means recommend this method, but the point is that sometimes you have to look for creative solutions for these problems. So, get the wire through the intervening wall somehow or other, screw the new box in place, then attach the wires to the outlet – white neutral to silver screw, black hot to gold screw, and bare ground to the screw at the bottom. Close everything up, flip the breaker on, and you’re done. Nothing to it really.


N.Y. Times, 8/21
I wrote an article for the Sunday N.Y. Times Business section on 8/21/10 about the construction business. They even paid for it, which was a thrill. Not my choice of title, though. Here's the link - http://www.nytimes.com/2010/08/22/jobs/22pre.html?scp=1&sq=Eric%20Smith&st=cse
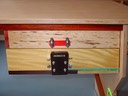
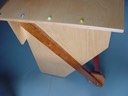
Floor Repair
This is a transition I created between a birch kitchen floor and a pine dining room floor in a 19th century house. The original transition was a thin oak threshold spanning a gap between the floors.


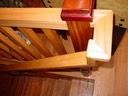
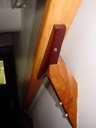
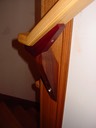

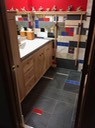
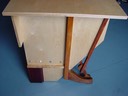
Valance
Colored glass beads are inset into holes in the maple valance so that light from the fixture over the sink shines through. The counter is soapstone. The crown molding is maple with a repeating pattern of circle, square, triangle in paduak, walnut and purpleheart, with a strip of cherry tying them together. The crown was conceived as a visual distraction from a sloping ceiling that was too low to be leveled.
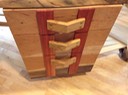
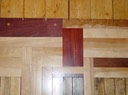
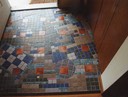
Abstract floor designs
I enjoy random patterns of colors and textures. These floors took longer than conventional floors made from a single type of tile laid out in a grid, but they're more satisfying to look at.


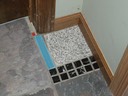

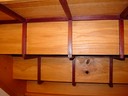
Fireplace and tile floor
This fireplace is part of a living room/bedroom addition. The floor and wall tile are a mix of inexpensive stone tiles from home centers and sample tiles I'd accumulated over the years. The wall detail is made from scraps of wood, glass and copper on a knotty cherry veneer plywood, and is repeated with variations elsewhere in the room.

How to replace a toilet
The first step is to select a new toilet. Make a checklist of features you like, then ask friends and neighbors for recommendations. Check out consumer guides. Start paying attention to what’s out there (or, more accurately, under you). Look for quality. Too many homeowners just buy whatever’s on sale and then end up right back where they started, struggling to flush even insignificant movements. Unpack the new toilet and inspect it as soon as you get home. If it’s defect-free strap on your tool belt, turn the water off and roll your sleeves up. Flush ‘old unreliable’ one last time and then sponge out any water left in the tank and bowl. Cram the sponge deeply down into the bowl to get all the water out. This may seem unpleasant but giving in to queasiness now will lead to disabling feelings of revulsion later, so plunge ahead. Disconnect the water supply line from the underside of the toilet and look inside the tank. Two large bolts with rubber gaskets hold the tank to the back of the bowl, and to undo them you need to reach in the tank with a screwdriver and hold the bolts in place while loosening the corroded nuts under the water tank. This may sound hard, and in fact it is. Next, remove the nuts holding the toilet bowl to the floor and yank the bowl up. Underneath you’ll see a dark hole with thick goo around the rim. This is the waste line, the portal to the main sewer or septic field. It will smell, so stuff a rag down into it quickly. Scrape up the goo - the gummy remnants of the wax ring used to seal the joint between the bowl and the toilet flange. Wax rings are the last line of defense in the waste removal system, preventing flushage and odors from exploding out onto the bathroom floor. Scientists estimate that the average American family uses their toilet 32.6 times a day, and one could easily believe that the mess smeared on the floor under the old toilet was some dreadful residue of all that hard use. But it’s not. (Believe me, memory and imagination are a plumber’s worst enemies.) Still, there is some danger of sepsis (a potentially life-threatening medical problem) if you accidentally scratch your hand while scraping, since an open wound would create an easy pathway into your blood for toxic bacteria. Frankly though, it’s the next step that rarely goes well for me. But I’m sure it will for you, and I don’t want to scare you away from this simple home improvement project by talking about every little problem that might occur. However, if the floor and the surrounding joists under the toilet do turn out to be rotted from years of leaking - to take one common for-instance - simply remove all weakened subflooring and the finished tile floor resting on it (in some cases also the bathtub and vanity), install temporary support walls in the basement under the rotted joists, cut out the damaged sections, re-route any wiring, plumbing and heating running through the joists (bringing them up to code if necessary), jack up the floor with a hydraulic jack to correct any settling, splice on new joists, lay down new subflooring, retile and grout the floor, then reinstall the fixtures. Presumably the main waste line running through the house and out to the street is in good shape, with no leaks or cracks of the kind that can secretly cause thousands of dollars in damages, but of course it’s difficult to know. Finally, clean up the mess and unpack the new toilet. You’re almost done! The rest of the installation is simple enough and needs little explanation. Just repeat what you did to remove the old one, except in reverse. Consult the manufacturer’s directions if you become confused. Incidentally, the first flush after you fill the new tank may seem sluggish, but this just means you forgot to remove that rag you stuffed into the waste line. Have a laugh – then drain and remove the new toilet, pull the rag out and reinstall everything. Remember, though, to put a fresh wax ring on the bottom of the toilet every time you reinstall it. Without a perfectly sealed wax ring toxic sewer gas can vent out and silently fill your entire house while you sleep. And unfortunately under certain circumstances this can kill you.

Little friends underfoot - creating and preserving invertebrate habitat in your home
Thoughtful homeowners are starting to question this industry-encouraged campaign of extermination that we wage on our tiny fellow creatures. Some are even asking the question, “Why can’t people and bugs learn to coexist? Isn’t there room for everyone?” Centipedes, spiders, ants, termites, cockroaches, beetles, silverfish, houseflies, mites - there’s a world full of fascinating insects anxious to share your home; a world packed with drama, with armies on the march, skillful predators and elusive prey, grazing herds, solitary dreamers, lightning fast runners and ace dive bombers - even loyal friends. Consider the cockroach. Traditionally despised, squashed and poisoned at every opportunity, they are in fact easy-going and quite intelligent, with their own distinctive personalities, and not at all difficult to train. Because of their long history of conflict with humans, they tend to scatter when the light comes on, but once you show them that your intentions are friendly and that you have some tasty food to share they’ll actually come out from their hiding places when you call them. They’re happy in any warm, dark place, and they genuinely seem to like people’s company. With very little encouragement they will give back as much as they take. Another favorite in our home are spiders. No special preparations are needed to attract them, although they appreciate a bit of a draft, and of course a steady supply of food. We leave our screens open in the warm months to attract tasty tidbits inside. Then, if our little arachnids become too abundant, we just close the screens. There are ways to share your home with little creatures without feeling overrun. As with any animal, you need to be very clear about setting limits and boundaries. The who and what of mealtimes has to be firmly established. For instance, unless their appetites are properly channeled, termites and carpenter ants can cause quite a bit of inconvenience for owners of wood houses. One successful strategy for enjoying the company of these captivating social insects without losing your house entirely is to construct a floor level viewing chamber full of standard 2 x 4s, but lined on all sides with heavy gauge sheet metal and capped with thick plate glass for easy viewing. Set the plate glass in a tightly fitting steel channel welded to the sheet metal with an arc welder (welders can be rented, if you don’t have one on hand). Install a water source to keep the wood moist - a must for carpenter ants (although termites aren’t so fussy). I use lengths of 1/2” rigid PVC tubing with a 1/32” hole drilled into it about every foot, capped at one end, with a shutoff and a connection to the house water supply at the other end. Once a day I’ll briefly open the shutoff - just enough to dampen the wood. If you get the moisture just right, you’ll get some gorgeous fungi as an added bonus. You can also hook up a timer and servomechanism to the shutoff, so that the whole operation could be done automatically - consult a commercial greenhouse supplier for parts. A small, tightly sealed hatch is also a good idea for termites, so you can feed them fresh lumber when the original supply is gone. Mr. G. H. of Abilene, Texas writes me about an interesting ant training experiment he’s been working on for the last five years. Every evening before bed he spreads refined sugar over his stomach, being careful to leave a thin trail of it from his bed to a known ant colony behind his baseboard. At first the ants were shy, but now when Mr. G. H. comes into his bedroom the workers rush out excitedly, aware that their snack is on it’s way. They have lost any fear of climbing up on him, and a bold few will even pluck small crumbs from his beard. The colony has grown quite large, and early this summer sent out a flight of queens inside the house - a sure sign of trust. As we say in our house: Think before you thwack.